


Adventures in Cheesemaking
A seemingly endless stretch of cold, short, grey days from November to February makes some of us want to put on sweatpants and binge watch Netflix until Daylight Savings Time begins. But that’s going to get old, fast. Ok, maybe not, but bear with me.
Winter is actually a wonderful time to explore a new hobby, particularly one that you can do from the comfort of your own home. In the spirit of trying new things, I, along with a friend of mine, recently embarked on home cheesemaking. We looked around online and were considering buying a kit when I heard a story on NPR about a “faux cheddar” that you can make in one hour. Sold!
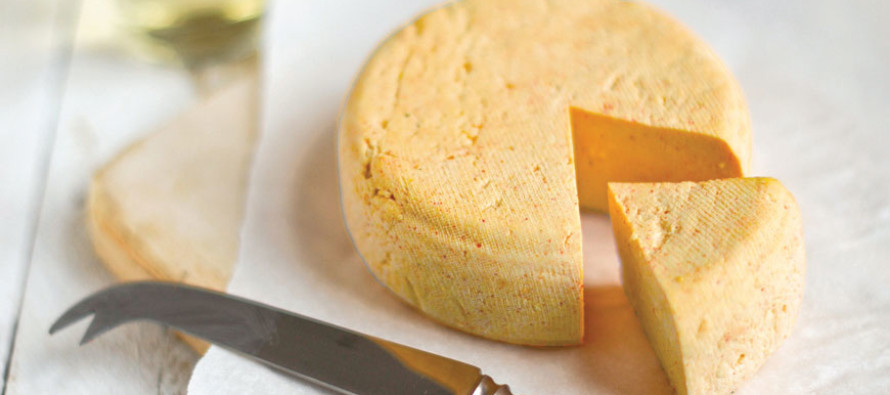
The smoky cheater – the name of this particular faux cheddar – comes from Claudia Lucero’s book, One-Hour Cheese. Unlike a true cheddar cheese, which can require between two and ten months of aging, this faux cheddar is ready in one hour. Lucero described her finished product as “a firm, savory cheese with a golden hue – a sliceable cheese with a bit of tart aftertaste.”
The smoky cheater’s ingredient list is short and most items can be fetched from any neighborhood grocery store. Aside from these ingredients, you’ll need cheesecloth and an instant read thermometer. I’ve never purchased rennet and wasn’t sure if I would find it easily so I purchased some on Amazon. This recipe calls for tablet form, but you can also use liquid rennet (just be sure to check the conversion).
1/2 teaspoon turmeric
2 teaspoons smoked paprika
1 1/2 teaspoons smoked salt
1 teaspoon flake salt
1/2 tablet vegetarian rennet
1/2 cup dechlorinated water
1 gallon whole cow’s milk (not ultra-pasteurized)
3 tablespoons apple cider vinegar
Start by pouring the gallon of milk into a large pot and whisking in the apple cider vinegar. Then, add your spices, whisk to combine and heat to 95 degrees Fahrenheit. Add the water/rennet solution, mix until well incorporated and heat to 105 degrees.
As a first-time cheesemaker, I was a bit nervous about staying at the exact temperatures the recipe indicated and, frankly, didn’t do a good job of it. Our cheese seemed to progress as the recipe indicated, for the most part, so don’t get too hung up on specific temperatures. “It’ll be ok,” my friend and I decided, is a good motto for home cheesemakers.
At around 105 degrees, the milk will begin to coagulate. The curd will begin to pull away from the edge of the pot when you press the top and you’ll notice a clear separation between the curd and the whey.
Once the curd begins to pull away from the edge of the pot when you gently press the top, you can use the whisk or spoon to chop it into pieces about one inch in size. Then let the curd continue to cook in the whey for about two more minutes.
At this point the curd will change from a softer yogurt-like texture to something closer resembling scrambled eggs. Continue to heat to around 120 degrees, moving the curds around the pot.
Once the curds and whey mixture reaches 120 degrees, you should reduce the heat. While maintaining the temperature, use the back of the spoon to squeeze the curds against the side of the pot, pushing out more whey.
You can pick up the curd with your spoon and press it with your fingers to track the changes in texture.
Our curds didn’t come together as well as the recipe indicated and I suspect it may be that we did not use enough rennet. We used liquid rennet instead of tablet and I’m not sure if the conversion was exactly right. Again, be sure to check the conversion for tablet to liquid rennet if substituting.
When the curds were fairly stable and didn’t seem to be changing much, we poured the mixture into a cheesecloth-lined colander and allowed it to drain for about 10 minutes. Then, we picked up the cheese in the cheesecloth and squeezed as much of the remaining whey out as possible.
Now prepare to get your hands dirty – add your salts by breaking apart the pressed curd and mix thoroughly to distribute. Gather the edges of the cheesecloth and again squeeze out remaining whey.
You’re now ready to place your cheese into a mold. We just used a small bowl. With the cheesecloth still around the curd, press into your mold. Place the mold in the freezer for five minutes, then unwrap and remove your cheese from the mold.
The verdict? I thought the smoky cheater was a great introduction to cheesemaking. Even for two very inexperienced cheesemakers, the process truly only took an hour from start to finish. Our final product didn’t turn out exactly as the recipe indicated – Lucero described the smoky cheater as “sliceable” and ours was very crumbly. But the smoked salt and paprika gave the smoky cheater a wonderful depth of flavor. Now that we’ve gone through the process once, I think it will be easier next time around.
Up next, mozzarella…

No comments
Write a commentOnly registered users can comment.
